TPWY630/400 BUTT FUSION MACHINE OPERATION MANUAL
Applicable Range And Technical Parameter
|
Type |
TPWY-630/400 |
| Materials |
PE, PP and PVDF |
| Range of diameter |
400㎜~630㎜ |
| Ambient temp. |
-5~45℃ |
| Power supply |
380 V±10%, 50Hz |
| Total power |
12.2 Kw |
| Include:Heating plate |
9.2 Kw |
| Planing tool |
1.5 Kw |
| Hydraulic unit |
1.5 Kw |
|
Max. Pressure |
6.3 Mpa |
|
Total section of cylinders |
23.06 cm2 |
| Hydraulic oil |
YA-N32 |
| Max. Temperature |
<270℃ |
|
Difference temperature of heating plate interface |
±7℃ |
| Total weight, Kg |
635 |
Special Description
We recommend reading the entire text very carefully to insure the operator and equipment safety before starting to use the machine. This operation manual should be kept carefully for future reference.
3.1 This equipment does not suit for no describing material pipe welding; otherwise it may damage or occur accident.
3.2 Don’t use the machine in the place of explosive danger.
3.3 The machine must be used by professional operator.
3.4 The machine should be operated on dry area. The protective measures should be adopted when it used in rain or on wet ground.
3.5 The input power is 380V±10%, 50Hz. If uses extend input line, the line must have enough lead section.
ApplicationsDescription Of The Parts
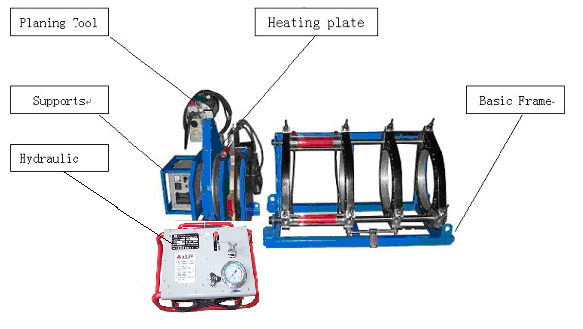
The machine is formed from basic frame, hydraulic unit, heating plate, planing tool, support of planing tool and electric box.
4.1 the machine configuration
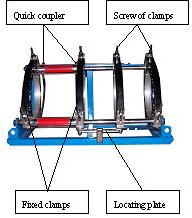
4.2 Basic frame
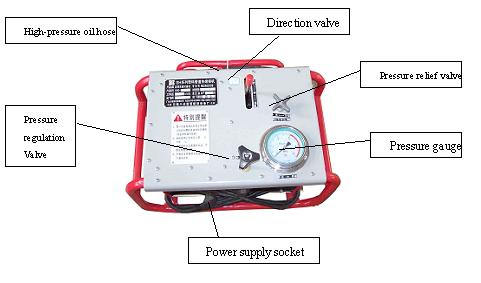
4.3 hydraulic units
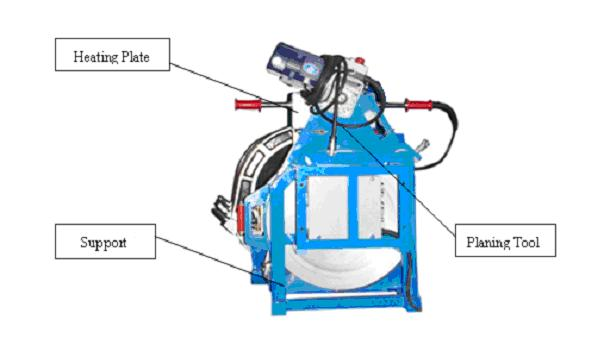
4.4 Planing tool and heating plate
Instruction For Use
5.1 All parts of equipment should be placed on stable and dry plane to operate.
5.2 Ensure the power according to the butt fusion machine requested, the machine is in good conditions, the power line has not breakage, all instruments is normal, the blades of planing tool are sharp, all necessary parts and tools are complete.
5.3 Hydraulic and electric connection
5.3.1 connect the basic frame with hydraulic unit by quick coupler.
5.3.2 connect the heating plate line to electric box in basic frame.
5.3.3 connect the heating plate line to heating plate.
5.3.4 Install inserts according to out diameter of pipe /fitting to basic frame.
5.4 Welding procedure
5.4.1 Check the diameter and wall thickness or SDR of pipes/fittings to be welding are right. Its surface must be check before begin to weld, if the scratch exceed 10% of wall thickness, it must be partial cut to use.
5.4.2 Clean the inside and outside surface of pipe end to be welded.
5.4.3 Place the pipes/fittings in inserts of frame, the length of pipes/fittings end to be welded extending out of insert maybe are the same (as short as possible). Another end of pipe should be support by rollers to reduce friction. Then screw down the screw of clamps to hold the pipes/fitting.
5.4.4 Put the planing tool into the frame between the pipes/fittings end and switch on, close the pipes/fittings ends by operating direction valve of hydraulic unit until there are have continuous shavings appeared on both ends (shaving pressure less than 2.0 Mpa). Put the direction valve bar on middle position and keep a few seconds, then open the frame, switch off the planing tool and remove it out of frame. The shavings thickness should be 0.2~0.5 mm and it can be adjusted by adjusting height of the planning tool blades.
5.4.5 Close the pipe/fitting ends and inspect misalignment of them. The max. Misalignment should not exceed 10% of the wall thickness, it could be improved by adjust pipe alignment and loosen or tighten the screws of clamps. The gap between two pipe ends should not exceed 10% of wall thickness, or should be cut again.
5.4.6 Clear the dust and remained on the heating plate (Don’t scratch PTFE layer on the surface of heating plate).
5.4.7 Put the heating plate into frame between the pipe ends after the required temperature arrives. Arise the pressure up to its required till the bead has reached correct height.
5.4.8 Reduce the pressure to the value that is sufficient to maintain both ends of the pipes/fittings contacting with heating plate for soaking time required.
5.4.9 When the time has reached, open the frame and take out the heating plate, close two melting ends as quickly as possible.
5.4.10 Increase the pressure up to welding pressure and keep the joint to cooling time. Relief the pressure, loose the screw of clamps and take out the jointed pipe.
Timer Instrument
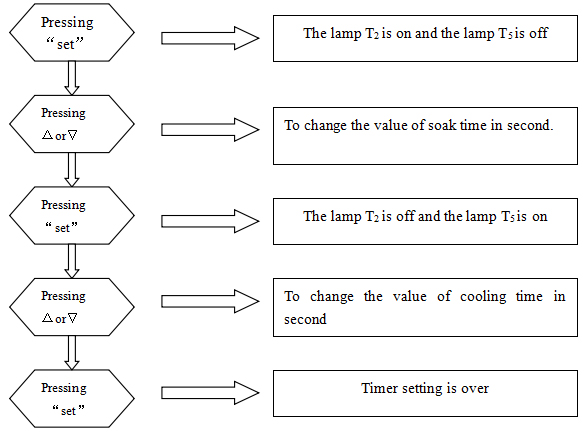
If one of the parameter is changed, such as out diameter, SDR or material of pipe, the soak in heating time and cooling time should be reset according to welding standard.
6.1 Timer setting
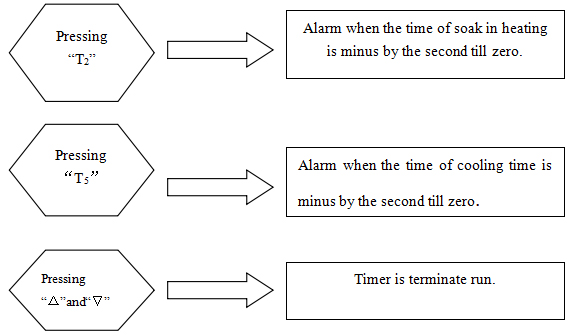
6.2 Instruction for Use
Welding Standard And Check
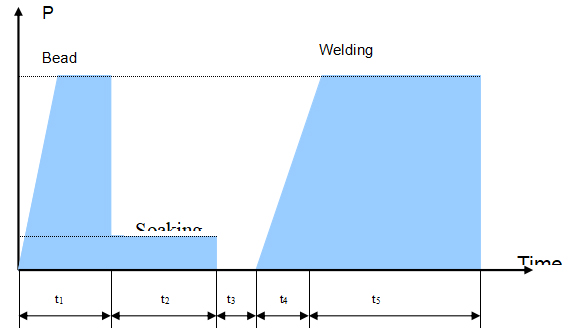
7.1 Because of different welding standard and PE material, the time and pressure of phase of butt fusion process is different. It suggests that pipes should prove the actual welding parameters and fittings manufacture.
7.2 Reference standard DVS2207-1-1995
|
Wall thickness (mm) |
Bead height(mm) |
Bead pressure(Mpa) |
Soaking time t2(Sec) |
Soaking pressure (Mpa) |
Change-over time t3(Sec) |
Rising time t4(Sec) |
Welding pressure(Mpa) |
Cooling time t5(min) |
|
0~4.5 |
0.5 |
0.15 |
45 |
≤0.02 |
5 |
5 |
0.15±0.01 |
6 |
|
4.5~7 |
1.0 |
0.15 |
45~70 |
≤0.02 |
5~6 |
5~6 |
0.15±0.01 |
6~10 |
|
7~12 |
1.5 |
0.15 |
70~120 |
≤0.02 |
6~8 |
6~8 |
0.15±0.01 |
10~16 |
|
12~19 |
2.0 |
0.15 |
120~190 |
≤0.02 |
8~10 |
8~11 |
0.15±0.01 |
16~24 |
|
19~26 |
2.5 |
0.15 |
190~260 |
≤0.02 |
10~12 |
11~14 |
0.15±0.01 |
24~32 |
|
26~37 |
3.0 |
0.15 |
260~370 |
≤0.02 |
12~16 |
14~19 |
0.15±0.01 |
32~45 |
|
37~50 |
3.5 |
0.15 |
370~500 |
≤0.02 |
16~20 |
19~25 |
0.15±0.01 |
45~60 |
|
50~70 |
4.0 |
0.15 |
500~700 |
≤0.02 |
20~25 |
25~35 |
0.15±0.01 |
60~80 |
Remark:
Expressions:

Advert Proceeding Of Safety
It’s strongly suggested to read and follow carefully the following safely rules before operating the machine.
8.1 The skill operators must train before using and operating the machine.
8.2 The machine should examine and repair and use two years ago for on the safe side.
8.3 Power: The power supply plug is supplied with the safety rule for skill operators and machine safety.
The safe setting must be with word or figure so that identify.
Connect with the machine and power: The input power is 380±20V of 50Hz. If uses extend input line, the line must have enough lead section.
Grounding: It must has a transmitting signal of line on the building site, the resistance with grounding is suit of protect setting and ensure not exceed 25 voltage and setting or testing by electrician.
Electric storage: The machine must be exactly using storage for ensure safety.
Connect with the machine must be consult operated rule.
※ Avoid any kind of accident caused by electrical.
※ Avoid cut off the power supply by drag
※ Avoid moving ,drag and put up the machine by cable-line.
※ Avoid edge and weigh on cable-line, temperature of the cable-line shouldn’t exceed 70℃.
※ The machine should be operated on dry area. The protective measures should be adopted when it used in rain or on wet ground.
※ The working area must be clean.
※ The machine should be examine and repair period of time.
※ From time to time cable-line of the insulation should examine and be special pressed it
※ It is very dangerous to use the machine in case of rain or in wheat conditions.
※ Residual current operated circuit breaker should be repair by the month.
※ Electrician should exam the grounding of status.
※ When purge of the machine carefully, don’t mangle the machine’s insulated or use benzine, impregnant and so on.
※ The machine should storage in desiccation of condition.
※ All the plugs must with plug out from the power supply.
※ The use of machines ago, the machine should keep in the perfect functioning conditions.
It is suggest reading and following carefully safely rules before operating the machine.
The accident of start-up: before the machine is operated, the power supply plug is supplied with the safety.
Pipes positioning into the machine:
Position the pipes into the clamps and fasten them, the distance of two pipe end should insert the planning tool and insure operating, avoid any kind of accident caused by electrical and operated.
The working of condition:
The working of area must be clean, dry and duly lighted.
It’s very dangerous to utilize the machine in case of rain or in wheat conditions or even close to flammable liquids.
Take care that all the people around the machine are at safety distance.
Clothes:
Keep the maximum care while utilizing the machine due to the high temperature involved on the heating plate always more than 200℃,it’s strongly suggested to use suitable gloves. Avoid long clothes and avoid bracelets, necklaces that might be hooked into the machine.
Take Notice Of Danger And Prevent Accidents
The butt fusion machine:
The use of machine must be by skill operated.
※ The heating plate
The heating plate due to the high temperature more than 270℃,it is suggest to take measure:
---use high-temperature gloves
---after butt fusion pipe with pipe, the heating plate must be insert.
---completed the heating plate must be located on the box.
---allowed not to touch on the heating plate.
※ The planing tool
---before Scraping operation , the pipes and the ground avoiding to dirty the faced pipes ends.
---completed the planing tool must be located on the Support for planing tool & heating plate
※ Basic frame
---started beforehand that the basic frame on the above mentioned assembling It’ suitable for all kinds of pipe to pipe welding.
---while starting operating take care to avoid leave legs or arms the movable. It’s compulsory to be far from the basic frame.
---take care that all the people around the machine are at safety distance.
---the skill operators must observe the safety rules.
Maintenance
|
Item |
Description |
Inspect before use |
First month |
Every 6 months |
Every year |
|
Planning tool |
Replace the blade or strickled again
Check if the cable was breakage Check if mechanical connection was loosen |
●
|
● |
● ●
|
|
|
Heating plate |
Check the cable and socket joints
Clean surface of heating plate, recoat PTFE layer again if necessary Check if mechanical connection was loosen |
● ●
|
● |
●
|
|
|
Temperature control system |
Checkout the temperature indicator
Check if the cable was breakage |
● |
● ● |
||
|
Hydraulic system |
Checkout pressure gauge
Check joint of oil pipeline was leak, tighten again or replaced seals Clean the filter Check the oil if lack Change the oil Check if the oil hose was breakage |
●
●
● |
●
|
●
● ●
|
|
|
Basic Frame |
Check if the tighten screw in the end of frame axis was loosen
Spray antirust paint again if necessary |
●
|
●
|
●
|
● |
|
Power Supply |
Press the test button of circuit protector to check the circuit protector is normal working
Check if the cable was breakage |
● ● |
● |


